Wednesday, June 30, 2010

Just Thinking of You

2s4y 55 1

Mint Motif is the fabulous new sponsor this week at 2S4Y! They are a brand new stamp company created and designed by the very talented Kimberley Crawford. Here is my card using her Very Squares line and my sketch 55. Come and join the fun for your chance to get your paws on some M&M stamps!

Thanks for all your sweet comments!
Photobucket


Saturday, June 26, 2010

Thinking of You

thinking of you 1

Here is a card I made using WPlus9 Stamps! What an awesome company I LOVE each and everyone of their fabulous stamp lines.I used the Love Birds set. This color combination might be my new favorite, I love this deep majestic blue, combined with kraft, turquoise and cream = heavenly!

Thanks for all your sweet comments!
Photobucket

Wednesday, June 23, 2010

Giggle Bears, Birds & Bees Blog Hop!


Today is the day!! Please let me present Antidepresstamps Giggle Bears, Birds & Bees Blog Hop!

The very talented Nina Aaslund is the featured designer of these awesome stamps. You can buy this great set at Starving Artistamps. Here are a few of my cards I made using this awesome set. Please play along for your chance to win this entire collection!


SA I love you honey 1

SA i love you honey 2

good friends

good friens 2


Thanks for all your sweet comments!
Photobucket


Monday, June 21, 2010

Starving Artistamps Sneak Peek!

Starving Artistamps has a HUGE unveiling right around the corner and I thought I would tease you all with a little sneak Peek. The very talented Nina Aaslund is the featured stamp designer and she did not disappoint. Nina's new line of stamps are adorable.

Starving Artistamps thought a very special BLOG HOP was in order for this big unveiling. The HOP will begin on Wednesday, June 23rd starting at 11:00a.m. EDT.

I hope to see you then!

Thanks for all your sweet comments!
Photobucket


Sunday, June 20, 2010

Keep Growing & A Bow Tutorial

gcd tutorial card 1

gcdtutorial card2

Bow Tutorial
tutorial1
1. Pick out your ribbon, any size, any width.
You will want at least 2 yards.

tutorial3
2. Loop your ribbon back and forth 4 times, pinching in the middle.

tutorial2
3. Turn your ribbon, cut a smaller piece to tie in the middle.

tutorial4
4. Tie off your bow tightly with your smaller piece of ribbon.


We are gaga over bows at g.c.d. facebook! I have a special place for ribbon in my heart. A slight obsession would best describe it. I just cannot pass up a spool of ribbon. Each spool of ribbon has it's own personality, but once you tie it into a beautiful bow it takes on another dimension. I thought I would come up with a new fun way to tie a beautiful bow, and share how to create it in a step by step tutorial. Also here is a card I created using all fantabulous g.c.d products and my new bow.

Thanks for all your sweet comments!

Photobucket


Monday, June 14, 2010

We're Quite the Pear!

laura2s4y1

laura 2s4y 2


A brand new sponsor is up at 2 sketches 4 You, My Favorite Things has so many fun stamps and embellishments to play with. Here is your chance to win some yummy goodies. Come and play along. Here is my card using some My Favorite Things stamps.

Thanks for all your sweet comments!

Photobucket

Monday, June 7, 2010

G.C.D. Portfolio & Pillow Box


Father's Day Pillow Box
gcd pillow box

gcd pillowbox 2


Portfolio
gcd portfolio 1

gcd portfolio 2

gcd potfolio 3

This months g.c.d. facebook challenge was to use bows, ties, and bow ties. Bows are one of my favorites, which might explain my enormous ribbon collection!

There is nothing like giving someone you love a handmade gift. Here are two examples. Father's Day is right around the corner and I thought I would stuff this little pillow box full of fabulous gift cards for my hubby to let him know I appreciate him being a wonder father to our daughter. I decorated it to the tee with amazing g.c.d. products complete with a masculine bow.

My other handmade gift is a personalized portfolio that I plan on giving to my sweet daughter. She can store drawings and journal entries it, and save it for a special keepsake. It's easy and fun creating and altering with all of the fabulous products g.c.d. has to offer. You can see all of their awesome collections HERE.

Thanks for all your sweet comments!

Photobucket

Monday, May 31, 2010

Congratulations

congrats1

congrats2

Tutorial:


1. Align your paper on your Position-it, secure your paper with sticky notes or tape.
2. Stamp your image using the grid to align your image perfectly, by just sliding the paper horizontally.
3. Re stamp your images perfectly to make a darker look.


We are celebrating two years at 2S4Y these past couple of weeks with two sponsors! Lawn Fawn & Scor-it, featuring Cathie Allen's Position-it. I have made this card with tutorial using Lawn Fawn stamps and the very cool Position-it.

Thanks for the sweet comments!

Photobucket


Thursday, May 20, 2010

Let's Celebrate G.C.D Style

gcdgradient1

gcdgradient2

gcdgradient4

gcdgradient7

G.C.D's product is such a pleasure to work with. The colors and style of each one of their products make your projects pop! This months G.C.D. facebook design team challenge was to use gradient color. I put together a gradient pink trio of a bridal shower invite, mini treat box, and thank you all using the G.C.D. Homespun Chic Collection. Included is a template and tutorial on how to make your own mini treat box.


Mini Treat Box Template
(print at Width 605 Height 783)
on
8 1/2 x 11 paper


1. Print out your box template.
Make sure you print on the side of the paper that does not have a pattern or texture.


2. Cut out your template.

3. Snip your 4 dotted corners

4. Scor your dashed lines

5. Flip your template over so your texture or patterned paper is up.
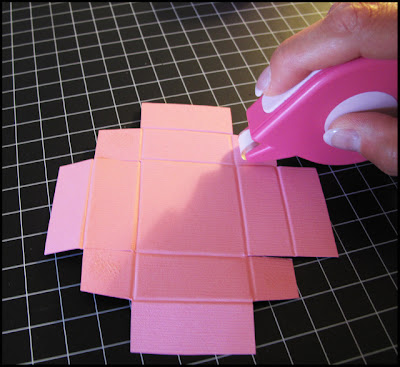
On the template tabs add adhesive.

6. Fold up your tabs so your template assembles a box base.

7. Assembled box base.

8. Add adhesive to the four small tabs that were cut.


9. Fold up your four small tabs to assemble your box top.


10. Fold over your big tabs to make your box top sturdy and give it a finished look.


11. Finished box top.

12. Assembled mini box.
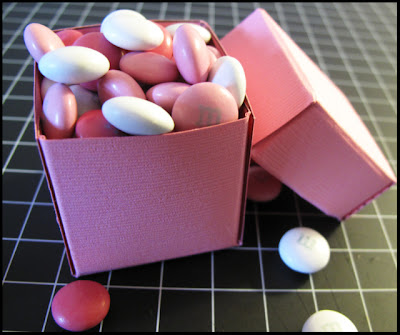

13. Fill and embellish your cute mini box.


Thanks for all your sweet comments!

Photobucket


SITE DESIGN BY DESIGNER BLOGS