Alright.... let me clarify that this is my first video tutorial! Making this video was a lot harder than it seemed, and I'm sure with practice I can master the video tutorial world. Please excuse all my mistakes and the fact that all you can see in this video are my boobs... HELLLLOOO! :D
Any-who, I hope you all learned how I tie my bows. I had tons of requests for this tutorial, and would love to provide more and sharpen my video skills. If you would like to see more tutorials from me, please just give me topics in my handy chat box.
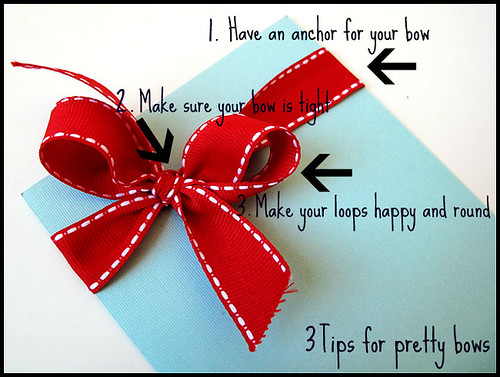
Here are just a few things to remember...
1. Use quality ribbon that is soft and flowing and easy to tie with. Try to avoid hard, crunchy ribbon.
2. Use an anchor for your bow. This guarantees a nice tight bow. You do not want a loose sloppy bow.
3. Make sure your bow is tight. Pinch and pull tight while tying your bow.
4. Fluff up your loops with your finger tips making them round and happy!
Thanks for all your sweet comments!


20 comments:
Thanks for the tutorial, my friend! Now we can all make beautiful Laura cards. ;)
Nice hooters, too!
Thanks for sharing Laura!! I have always wondered how you made those fabulous bows.
Sweetness. The boobs video :P I put my camera on a tripod and flip the tripod head down. That way the camera is above my hand. Or, I've done it where it's peaking from behind me but the tripod with camera facing down is the best :)
Nice tut and lovely ribbon!
The use of double sided tape and a piece of "anchor" ribbon is a great idea! Yesterday, we uploaded a video How to Tie a Custom Bow For Your Creative Project using a black chiffon ribbon and the amount of ribbon we use is always surprising. It seems like you save quite a few inches with your anchor technique.
this was great, Laura! I will have to try this method. Thanks for sharing!
Thank you for sharing your secret recipe for bow making! I'm always admiring your bows so it's wonderful that you took the time to make this tutorial. You did a great job! ♥♥ Kay
Hi Laura! You did a great job on your first video! And your bows are lovely! I often get lots of questions about bow tying...I'll have to send those ladies over here! Maybe guys will be interested in learning to tie bows too since there's such a great looking model to show them! ;) Kathy
Great tutorial Laura! Thanks so much...your bows are always perfection!
(-: Heidi
Your first video was great!! Thank you for sharing your wealth of information!
Fab video Laura & all those trips to the gym sure pay off for you!! You look fab as well. ;) The card below is amazing. Have a great weekend. :)
Ohhh...yay Laura! Thanks for the tutorial! You make fab bows!!
hugs,T
Laura thank you so much for this bow tutorial...it has helped tremendously...I'm looking forward to trying this! :) Bonnie x
Great tutorial....never tried it that way! Too funny about the boobs! I wish I had boobs that got in the way of making a video!! LOL
Awesome Tutorial !!! I was wondering how on earth you get your photos so clear? They are always so bright and PERFECT!!!
thanks for the tutorial
Ashley, I always put my camera on macro and turn the flash off when I am taking a close up picture of my cards. Thanks for the sweet comment!
Laura
Great tutorial Laura, I love the anchoring technique..Thanks for the tip!
Thanks for sharing your secret Laura! I always wondered how you had the most PERFECT bows! Thanks for sharing - can't wait to try it lady! :)
Thanks for showing how to make bows! I always have a tough time and I will definitely be using your way from now on.
I loved your video ;0 Great job
Post a Comment